February 27, 2023
aipflorida
Bringing Your Motorcycle Out Of Storage
Getting your motorcycle road-ready after long-term or winter storage.
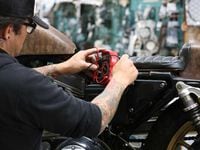
First off, give your motorcycle a thorough cleaning. A clean bike is easier to inspect, and nothing gets you to pay attention to all the parts better than a good detail job. Look for cracked rubber parts, rubber cables, and electrical or fuel lines, as they can become brittle and crack with age and need to be replaced. This is a good time to lube your cables as well, applying lubricant as you actuate your brake levers and twist your throttle.
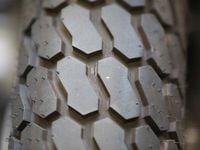
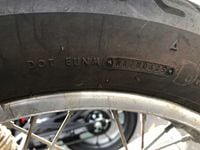
Next: tires. Nothing is more important for safety and performance of your motorcycle than its tires. Look closely for cracks between tread blocks and on sidewalls. Also inspect for abnormal swelling, as air can leak through the carcass and separate the tread rubber from it, causing a bulge that will lead to vibration or result in dangerous tread separation. If you have a rubber valve stem, inspect it for abnormalities like cracks or swelling. Check your tire date codes, which are the last four digits of the DOT number on the tire’s sidewall. The first two digits are the week, the last two are the year. For example, 1618 would be the 16th week of 2018. If the tire is three to five years old, consider replacing it. If your bike uses tubes and you don’t know exactly how old they are, consider replacing them as well.
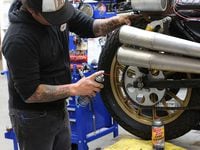
Clean and inspect your final drive. Chains are the most likely to need maintenance since they are prone to rust and constantly exposed to dirt. Raise the rear wheel and rotate it while noting kinks in the links and listening for noises. Then spray the chain with cleaner. Commercially available chain cleaner is best, and Maxima makes a convenient chain cleaning and lube kit. Don’t use harsh solvents like carb cleaner on an O-ring chain (it can harm the rubber O-rings), but in a pinch something like WD-40 is okay. Even mild detergent with water and a chain-cleaning brush like the Tirox will do a good job. If you use water, make sure the chain is dried completely before lubing it. Adjust the chain to manufacturer specs. If after cleaning and lubrication, you still note kinks in the chain, it may be time for a replacement.
ADVERTISEMENT
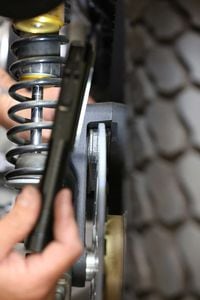
This is a great time to look at your front and rear sprockets. If the teeth are very pointy or hooked in an ocean-wave-like shape, it’s time for new sprockets. To check chain wear, lift a link off the very back of the sprocket—if you can pull any link more than halfway off its tooth, the chain should be replaced. In fact, replacing your chain and sprockets at the same time is always a good idea as this will ensure the longest service life and even wear. Running a worn chain on new sprockets or vice versa causes rapid wear.
Next grab a flashlight and check your brakes. On disc brakes, brake pads should have equal amounts of pad material remaining. Typically, minimum pad material thickness is in the 1.5–2mm range. Look for signs of brake fluid leaking from the master cylinder or calipers. It’s a great idea to bleed hydraulic brake systems at least annually. Drum brakes often require disassembly to inspect brake shoes. Hey, if you’re already replacing your tires, pop your brakes apart for a closer look. Clean and lube brake cables and lever pivots, and make sure the foot brake pedal moves freely. Closely inspect cables at their attachment points for signs of fraying.
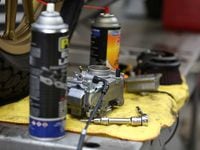
After that, pull and clean your carburetor, if your bike is so equipped. Gas will start to gum up after a while and that will clog the narrow passages in your carburetor, so get some carb cleaner and pull apart that carburetor. Pulling off the float bowl on the bottom of your carburetor will give you a good idea of the state of the rest of the mechanism. If this is gummy or dirty, chances are the rest of your carb is as well. Clean out your float bowl, then remove your float to inspect the jets—the small brass screws that gas passes through. If this is all new to you, the process can be a little intimidating, but this episode of MC Garage does a great job of showing you the ropes. After getting all your jets and needles clear, screw everything back together and reinstall your carb and air cleaner. If your bike is fuel injected, it will be a little more resilient in this category, but the fuel pump may still need to be pulled off and gone through if your bike has been stored for a very long time with gas in the tank.
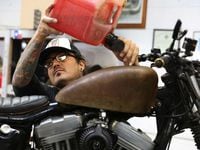
If there’s still old gas in your tank, pull it off and drain anything in there through the petcock. Then put a little bit of clean gas in there, swish it all around, and pour it out into an empty receptacle to make sure it’s clean when it comes out. You don’t want to undo all that carb cleaning work as soon as you turn your petcock on. If you’ve got an older bike, ethanol can mess up your rubber and plastic surfaces, so be sure to check your hoses for signs of wear as well.
This is where I would typically try to start the bike. We haven’t tested the battery yet, but hitting your starter will quickly tell you if it has any juice left and if you did a good job cleaning your carb. If it doesn’t start, check your battery.
Charge up your battery, and then, using a voltmeter, a device used to measure electrical current, touch the diodes to the appropriate battery terminals (red to red, black to black). Check the voltage marked on your battery, and compare that to the number displayed on the voltmeter. If the number on the voltmeter is substantially lower than your battery’s voltage even after charging, it will need to be replaced.
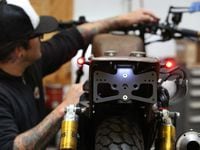
Now run the bike. While the bike is running, use your voltmeter to check the charging system by touching the diodes to the cables running from the bike to your battery to make sure charge is flowing back to the battery. Also check your headlight, taillight, and turn signals to make sure they’re all functioning properly. This will also get the oil pumping and out of the sump so you can accurately check those levels.

Once the engine is warm, check your oil levels and replace with new fluids. While it may not be timed right with your bike’s next maintenance interval, new oil isn’t too expensive, won’t hurt your motor, and is a must after extended storage periods.
With all of this done, your motorcycle should be ready to go out and hit the road, but it’s a good idea to do a few laps around the block before you go out and hit the highway. Always best to give the little things a chance to show up closer to home than at higher speeds, farther away. Enjoy the ride and be sure to remember for next time you put the bike into storage, use a battery tender and drain your gas!
By Morgan Gales
https://www.motorcyclecruiser.com/bringing-your-motorcycle-out-storage/
Categories: Blog